litchralee

joined 2 years ago
[–] litchralee@sh.itjust.works 1 points 2 hours ago* (last edited 2 hours ago) (2 children)

Minor question: what does pre-fall mean here? Is it pre-autumn? (Yes, I'm American lol, where "fall" also means autumn) Or does it mean the years prior to the fall of the Germany in 1945? Or maybe fall of the Soviet Union? Both would be plausible for the eras where radiation sources got lost on a near regular basis.

[–] litchralee@sh.itjust.works 4 points 5 hours ago* (last edited 5 hours ago)

If I understand this article correctly, e-scooters in the UK can only be operated on-street and not on sidewalks. (on this point, I'm in full agreement). But also, when used in the street, they must be insured. (IMO, this is weird). So when teenagers between 13-16 are caught operating an uninsured e-scooter, they personally are issued an "IN10 endorsements" which seems to be similar to a traffic ticket elsewhere in the world.

But since 13-16 year olds do not qualify for a UK driving license, this citation results in the delayed effect that when they later obtain a driving license, auto insurers will use the old citation to jack up the premiums.

In my opinion, as a Californian, this is bizarre and the only comparable thing here which has such a delayed effect is for underage possession of alcohol in a car, or drunk driving or bicycling, where the administrative penalty is a one year delay from obtaining a driving license, for persons 13 and up. The distinction here is that California applies this for irresponsibility regarding alcohol, whereas the UK seems to think a lack of insurance for someone who can't even drive yet is somehow in need of equal penalties.

On the flip side, one could argue that UK teenagers using e-scooters now have yet another reason to not bother with driving an automobile at all.

[–] litchralee@sh.itjust.works 2 points 5 hours ago (3 children)

As an IPv6 advocate, it's quite something for me to see it show up in this community. Does that mean IPv6 is now commonplace enough to be dull? Who can say. :)

[–] litchralee@sh.itjust.works 1 points 2 days ago* (last edited 2 days ago)

The other comments have covered a lot of the background and variances throughout the world. But what I'll add is that few countries are purely in one camp or the other. To use the USA as an example, criminal cases are adversarial, in the sense that the defense attorney will duke it out with the government's attorney whether someone goes to prison.

For civil cases like a contract dispute, the procedure is closer to an inquisition system, although with the judge still merely presiding over the process. But attorneys in a USA civil case can depose witnesses, much like how (I think) a European judge-led inquisition would call a witness, and similar to how British coroners conduct an inquest (if murder mystery depictions on the BBC are accurate).

Perhaps the full thrust of the inquisition style can be found in USA federal agencies, whose rulemaking capacity requires asking direct questions to subject matter experts in a public forum, one which eventually leads to a determination on some germane topic, often enacting secondary legislation at the same time. Americans might not necessarily call such an action as a "ruling", but evidence was taken, all sides were heard, and even public comment was accepted, before rendering a decision.

That said, one could argue that such "Article III" rulemaking (eg FCC Commissioners) or judgements (eg Immigration Court) are distinct from the traditional judicial rulings from "Article I" courts (eg US Supreme Court). But that's a Constitutional wrinkle for another discussion.

[–] litchralee@sh.itjust.works 9 points 3 days ago (1 children)

In Western use, mostly for blowing one's nose or wiping sweat off one's brow. Sometimes in a cinematic manner which evokes refinement in the course of labor. Might also be used to blot tears, either one's own or to give to someone who has tears but no hanky.

In East Asian use, as a hand towel, since many public bathrooms do not provision paper towels. Very useful in the USA as well, since many restrooms are moving towards air dryers of varying quality. But a handkerchief is always on-hand and can also reduce time spent in the restroom.

I personally keep two handkerchiefs on me, for both the Western and East Asian use-cases.

[–] litchralee@sh.itjust.works 8 points 3 days ago

I am always deeply enthralled when math and comp-sci unite to yield an elegant result, where my definition of elegance is: efficient + minimal.

[–] litchralee@sh.itjust.works 13 points 3 days ago

I mean, you're still using a resource that was provisioned only for emergency use. The rough analogy is borrowing the exterior-mounted fire extinguisher of your apartment building to use it as a temporary paperweight, and then putting it back after two minutes.

Your use of it in this way might be benign, but if everyone is doing that, someone will eventually mess up and that resource won't be there when it's truly needed. Plus, what is the objective from calling your own elevator while you're in it? Just yell lol

I don't mean to sound boring, but while there's a time and place for pranks and fun in an elevator, I personally think the emergency equipment is off-limits. Everything else is fair game, up to and including playing Doom on the LCD screen that modern elevators seem to have.

[–] litchralee@sh.itjust.works 13 points 3 days ago* (last edited 3 days ago) (4 children)

Could you explain more about what you observed? Many elevator phones have an inbound number, so that emergency responders can return a call, although it would be unlisted for obvious reasons. So far as I'm aware, the phone is akin to a normal phone line, rather than being a special line like a payphone. So if you did find the number, it may be possible to call it.

That said, I can't endorse messing around with the emergency equipment in an elevator, even though it's not actively in use. Enough prank calls might cause the property management to disconnect the line, making it unavailable when an actual emergency arises. And even though that would incur legal liability for the management, that would still mean someone who needed help couldn't get help.

EDIT: And just to get ahead of anyone suggesting that calling the emergency phone is a way to test it, it really isn't. A true test would be making an outbound call to the emergency dispatcher, and then asking them to verify the caller ID and return the call. Good property management should already be doing this regularly, in the same way as testing the fire alarms and checking extinguishers.

[–] litchralee@sh.itjust.works 7 points 5 days ago* (last edited 5 days ago)

(I'm assuming you're in USA)

The other commenters have correctly described how you could run metallic conduit (EMT) or PVC, and that would be perfectly acceptable for "low voltage" wires like twisted pair Ethernet. But it's also kinda overbuilding it, because EMT or PVC are also suitable for "line voltage" AC electricity. Other conduit types are available, depending on your jurisdiction, since EMT is meant to provide physical protection and PVC is meant for be water-resistant. And both provide physical support for the wires within. None of these qualities are really required for Cat 5/6 cabling.

Here in California, it is permissible to use ENT -- with an N -- also known as Smurf tube for its blue color, for line-voltage applications where no environmental protection (physical, UV, vibrations) is required. Smurf tube is made from thin, corrugated plastic in standard sizes, so it's easy to pass through top-plates and anchor to studs. This makes it an excellent choice for organizing low-voltage wires, or for future proofing.

Indeed, if you really wanted to, you could terminate the Smurf tube into standard outlet boxes, so that there's zero exposure to the insulation batts within the wall, for when you later fish the cables through. For a still-acceptable arrangement, the Smurf tube could be anchored just above where you've cut out a hole for the future wall-plate, allowing retrieval of the cable through that hole. You should not later use these conduits for AC electricity though, and mixing low-voltage and line-voltage in the same conduit or box is typically prohibited.

I do think that conduit is true future proofing. Who knows if CAT6, 7, or 8 just gets replaced (finally) with fibre optic cables. Or perhaps you decide to become a ham radio operator and thus need to run specialized coax. Or maybe you really want a 50 ft HDMI cable from the upstairs living room down to the man-cave in this basement. Running wire today is temporary, but conduit is forever haha.

[–] litchralee@sh.itjust.works 4 points 6 days ago

This is essentially a quick rundown of open-source software licensing. The notice is saying that the TikTok app uses some software that is owned by Facebook, but that Facebook has irrevocably licensed the software such that anyone (including you or TikTok) can use and distribute that software for free, provided they follow the few rules in the BSD 3-clause license, which has three clauses: 1) include these three clauses with any source code copy of Facebook's software, 2) include these three clauses in the docs bundled with any compiled app that uses Facebook's software, and 3) do not use Facebook's name in a way that implies an endorsement or affiliation with Facebook.

TikTok can continue using that particular version of Facebook's software until the heat death of the universe, and Facebook can never come back later and demand payment from TikTok or you or anyone for that software. But Facebook is still considered the owner, because they retain the right to relicense the software under different terms, perhaps with a license that doesn't require including the copyright notice, for example. Likewise, Facebook has the right to sue to enforce the BSD 3-clause terms against anyone who isn't abiding by those terms. But it looks like TikTok is abiding, since they posted the full BSD 3-clause terms, so Facebook can't complain.

Note: Facebook could change the license for later versions of the software, but any versions prior would be unaffected. Integrating any software commercially always requires checking the license terms, and while open-source software has fairly standardized terms, diligence is still important and licenses do occasionally change.

[–] litchralee@sh.itjust.works 3 points 6 days ago (1 children)

To start, it might be worth reviewing the recommended antenna traces for wireless ICs, since vendors often provide precomputed and validated reference designs in their data sheets. These are often what are made into breakout boards, and there's a lot which can be learned by what these reference designs take into consideration.

I've not specifically done PCB designs with antennas, but I have done my own designs for high-speed differential signals, where the impedance of two traces have to be consistent along their length, whether side-by-side or on opposite sides of the PCB. As you observed, KiCAD can do a lot of this computation but good antenna design means even the pads that attach to the IC also need to be impedance-matched. And that requires both an understanding of where problems arise (eg when traces turn a corner), how to compute the effects (using KiCAD's features), and whether the issue might not even make a big difference in overall performance.

[–] litchralee@sh.itjust.works 1 points 6 days ago

I think you're right, as prosumer and low-end enterprise switch vendors have less of an incentive to bundle first-party xcvrs along with switch sales. However, the ISP and large-enteprise market segments still have vendor locks, although many have an "allow unsupported xcvr" mode which will apply best-effort to operate a third-party xcvr but the warranty won't be honored while such a xcvr is installed.

The likes of Cisco and HPE do things like this, but given that the target customers of such switches are buying them in the hundreds to thousands, and each switch already costs thousands of dollars, the cost of first-party pluggables is just a part of the deal. Such customers also value reliability to a greater degree, so even a miniscule prospect of incompatibility will be avoided.

Insofar as it pertains to this community, the ability to enable the unsupported xcvr mode means old high-end equipment gets a second life in someone's homelab, since warranties stop mattering there


A while ago, I wrote this overview of California's Coast Rail Corridor project, which would run conventional trains between the existing, popular, state-subsidized commuter rail systems in Northern and Southern California. This is nowhere near as sexy as high-speed rail, but imagine a single seat that rolls through the rice paddies outside Sacramento, past the oil refineries of Richmond in the Bay Area, down through Oakland adjacent the Coliseum, bisecting Silicon Valley, then hugging the coast of Central California towards the beaches of Santa Barbara entering Los Angeles County and then further to San Diego.

Then make it affordable and timely, and all of a sudden there's a way to spend time watching the scenery slowly, while also being practical. Trains are much less of a slog than sitting on a bus. High speed rail is important and laudable, but this humble, rather dull project will likely carry passengers between north and south a decade or more before high speed rail does, which is why the state is pursuing it in parallel.

I hope this type of content is an alright fit for this community.


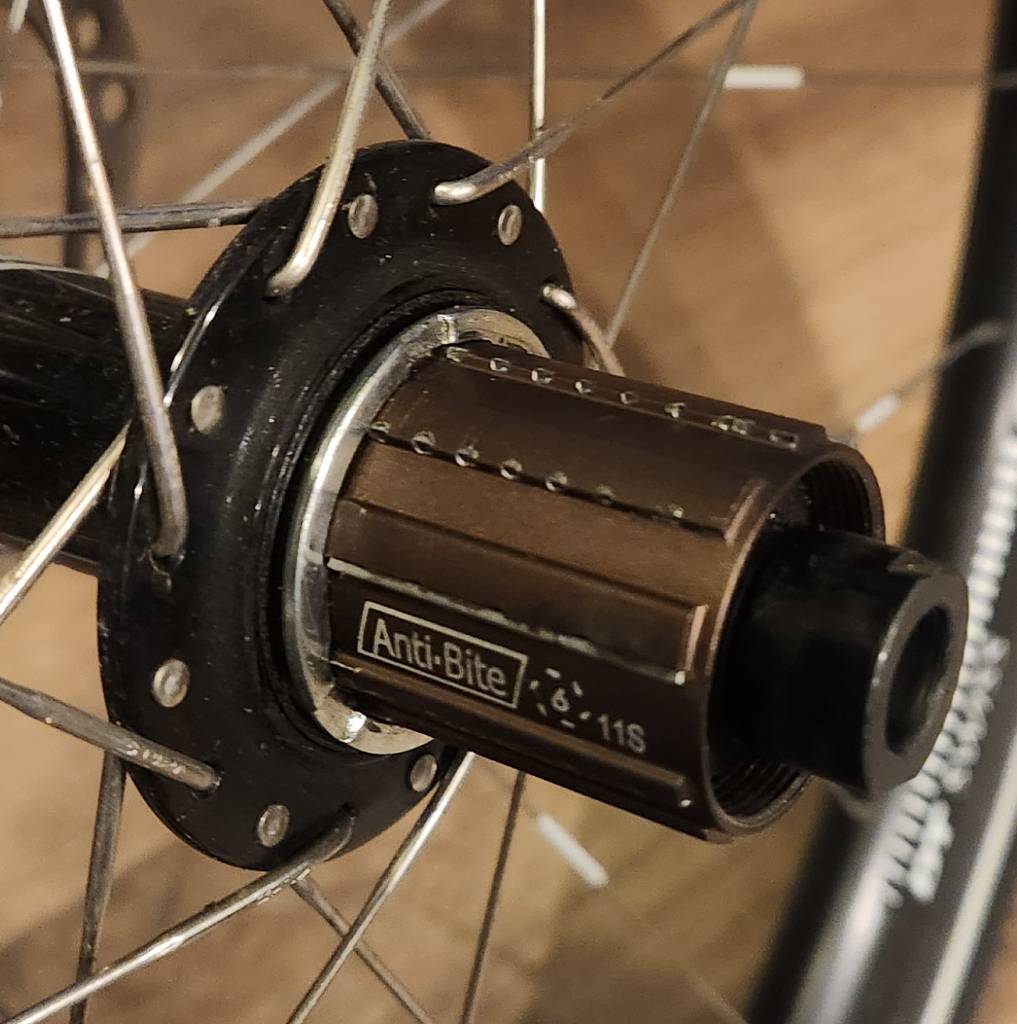
In the thumbnail is my freehub after running a new set of wheels for 1700 km. From how I understand the "anti-bite" feature, it should prevent the cassette from gouging further into the soft metal of the splines, by taking up those forces on the strip of steel on one of the splines. And that seems like a reasonable idea, since further gouging beyond a cosmetic issue would prevent removal of the cassette.

My question is whether the higher torque caused by a mid-drive torque might one day overwhelm the steel strip, resulting in a locked cassette to the freehub. So far, I don't see any evidence of the strip giving way, and I'm normally under the assumption that the allowable torques of standard bicycles -- although tested by ebikes -- should still tolerate this sort of application.

Does anyone know of scenarios where the anti-bite strip fails in-situ? Note that this isn't a particularly pricey freehub, and I mostly built up this wheel as a long-term test to see how long it would last. For when it does fail, I plan to rebuild with a DT Swiss hub, finances allowing.


(Does this community allow posts about product restorations? I didn't forge these skillets, but I did make them usable and appealing again.)

cross-posted from: https://sh.itjust.works/post/30170080

(long time lurker, first time poster)

A few months ago, a friend convinced me on the benefits of cast iron skillets. Having only used Teflon-coated non-stick pans, I figured it would be worth a try, if I could find one at the thrift store. Sure, I could have just bought a new Lodge skillet, but that's too easy lol.

So a few weeks pass and I eventually find these two specimens at my local thrift store, for $5 and $8 respectively. It's not entirely clear to me why the smaller skillet cost more, but it was below $10 so I didn't complain too loudly. My cursory web searches at the store suggested that old Wagner skillets are of reasonable quality, so I took the plunge. My assumption is that the unmarked, smaller skillet is also a Wagner product.

10-inch skillet ($5) 9-inch skillet ($8)
a crusty 10-inch cast iron skillet with "Wagner" vaguely visible in the inscription
a crusty 9-inch cast iron skillet; no brand name

It's very clear that both these skillets are very crusty. Initially, I tried to remove the buildup using a brass wire brush. This was only somewhat successful, so I switched to a stainless steel wire brush. That also didn't do much, except reveal some of the inscription on the bottom.

the 10-inch skillet after stripping with a wire brush, with "Wagner Ware Sidney" and "1058 1" visible in the inscription

Some research suggested I could either do an electrolysis tank, a lye bath, or try lye-based oven cleaner. For want of not over-complicating my first restoration attempt, I went with the oven cleaner method, using the instructions from this video: https://www.youtube.com/watch?v=2Pvf0m9jTeE

For both skillets, I had to apply the oven cleaner six times to finally shift all the crud, each time leaving the skillets in the garbage bag for a full day-and-a-half in the sun. In between applications, I would brush off more buildup, with the handle root and the skillet walls being the most stubborn areas. The whole process smelled terrible and hunching over the garage utility sink to brush pans is not my idea of a pleasant time.

Nevertheless, having stripped both pans, I proceeded with six rounds of seasoning with very old corn oil -- it's what was handy -- at 450 F (~230 C) using my toaster oven. This happened over six days, since I wanted to use my excess daytime solar power for this endeavor. I wiped on the oil using a single blue shop towel, to avoid the issues of lint or fraying with paper towel.

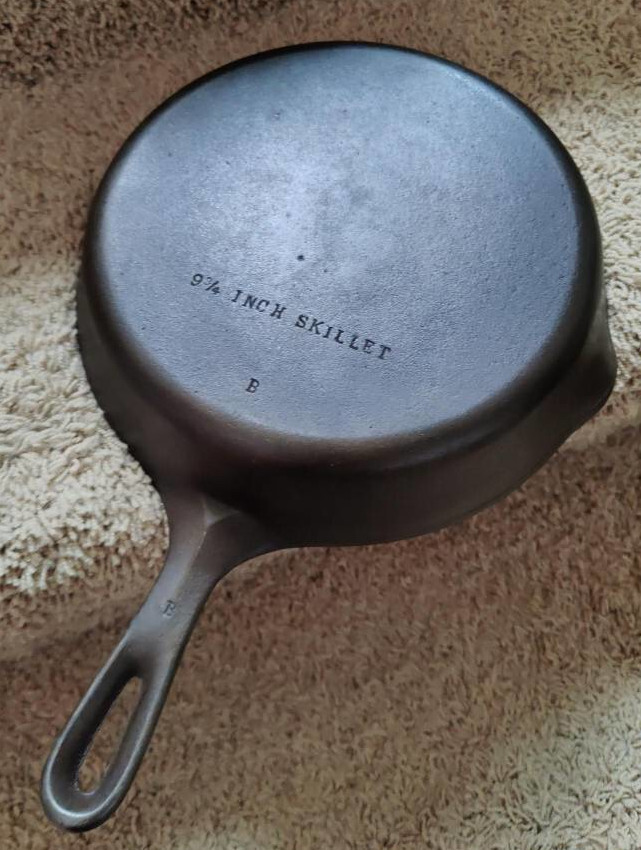
I don't have a post-seasoning photo for the larger skillet, but here's how the 9-inch skillet turned out. I think I did a decent job for a first attempt. And I'm thrilled that these are as non-stick as promised, with only minimal upkeep required after each use.

9-inch skillet, top side, with "7" inscribed on the handle

9-inch skillet, bottom side, reading "9 3/4 inch skillet"

3
submitted 2 months ago* (last edited 2 months ago) by litchralee@sh.itjust.works to c/keming@lemmy.world
 

Notforusein is a perfectly cromulent word. Or a brand name for sale on Amazon.com.

EDIT: this is a take-out bag for sandwiches, where the inside is apparently lined with aluminum to keep the heat in. Accordingly, they do not recommend the bag to be placed in a microwave oven.


We live in a very strange timeline where the Ontario Premier is outdoing American governors on what constitutes "really dumb ideas". If you live in Ontario, I would urge you to watch to the end of the video and file a public comment during Bill 212's consultation period, ending on 20 November 2024.

https://ero.ontario.ca/notice/019-9266


The median age of injured conventional bicycle riders was 30 (IQR, 13-53) years vs 39 (IQR, 25-55) years for e-bicyclists (P < .001). Scooter riders had a median age of 11 (IQR, 7-24) years at the time of injury vs 30 (IQR, 20-45) years for e-scooter riders (P < .001) (Table 1 and Figure 3). As a group, those injured from EV accidents were significantly older than those injured from conventional vehicles (age, 31 vs 27 years; P < .001) (eTable 1 in Supplement 1).

e-Bicycles have lowered barriers to cycling for older adults, a group at risk for physical inactivity.9,10 Biking has clear-cut physical and cognitive health benefits for older adults, so this extension of biking accessibility to older e-bicyclists should be considered a boon of the new technology.22,23 However, as injured e-bicycle riders are older than conventional bicyclists, the unique safety considerations for older cyclists should be a focus of ongoing study.

There is a popular conception that ebikes are ridden recklessly on streets and sidewalks by youths, doing dangerous stunts, riding against traffic, not wearing helmets, and incurring serious injury to themselves and others as a result. This conception is often used to justify legislation to restrict or ban ebike use by minors. However, the data suggests quite the opposite, as it is older riders which are racking up injuries.

The data does not support restrictions on ebikes, but rather their wholesale adoption, especially for audiences which are at risk of inactivity or disadvantaged by a lack of transportation options. Ebikes are not at odds with conventional bicycles.

The California Bicycle Coalition offers this succinct summary:

“We think this backlash against e-bikes is the wrong direction for what we want for safer ways for people biking and sharing the road,” said Jared Sanchez, the policy director for the California Bicycle Coalition. “We don’t believe that adding restrictions for people riding e-bikes is the solution.”

They also have a page on how to fight against "bikelash", aka naysayers of bicycles and bikes: https://www.calbike.org/talking-back-to-bikelash/


cross-posted from: https://sh.itjust.works/post/22165919

This entry of mine will not match the customary craftsmanship found in this community, but seeing as this was formerly a pile of miscellaneous, warped scrap 2x4 segments recovered from old pallets, I think I've made a reasonable show of things.

This bench is for my homegym, designed to be stood upon, which is why there's a rubber mat inlaid on the surface, a leftover of the gym floor. My design criteria called for even the edge of the top surface to support weight, so the main "box" of the bench uses 2x4 segments mitered (badly) together at 45 degrees, held together with wood glue.

I then routed the inner edge to support a 1/2" plywood sheet, which is screwed into the box. And then the rubber mat is glued down to the sheet, so there are no visible screws.

Finally, the legs are also 2x4 segments, cut so the bench sits 43 cm (~17 inch) from the floor; this is only coincidentally similar to the IPF weightlifting bench standards. I used screws instead of glue, just in case the legs needed to be shortened later.

All edges were rounded over with a 1/2" bit, as the bench is expected to be picked up and moved frequently. And everything stained in cherry and clear-coated.

Some of the annoyances from using scrap included:

  • Stripping old paint off. Awful chemicals, awful scrubbing, awful disposal.
  • Sanding away twists along the 2x4 segments
  • Filling nail holes or arranging them so they don't draw attention
  • My lack of experience with clamping and gluing wood that's not dimensionally consistent

wood bench beside a leg press

If I were to do this again, I'd figure out a way to reduce the amount of routing needed for the inner edge, since I essentially removed 0.75 inch by 1.5 inch of material all around the edge. This took forever, and perhaps a CNC machine would have simplified things, in addition to squaring and planing the surfaces before mitering.

76
submitted 7 months ago* (last edited 7 months ago) by litchralee@sh.itjust.works to c/woodworking@lemmy.ca
 

This entry of mine will not match the customary craftsmanship found in this community, but seeing as this was formerly a pile of miscellaneous, warped scrap 2x4 segments recovered from old pallets, I think I've made a reasonable show of things.

This bench is for my homegym, designed to be stood upon, which is why there's a rubber mat inlaid on the surface, a leftover of the gym floor. My design criteria called for even the edge of the top surface to support weight, so the main "box" of the bench uses 2x4 segments mitered (badly) together at 45 degrees, held together with wood glue.

I then routed the inner edge to support a 1/2" plywood sheet, which is screwed into the box. And then the rubber mat is glued down to the sheet, so there are no visible screws.

Finally, the legs are also 2x4 segments, cut so the bench sits 43 cm (~17 inch) from the floor; this is only coincidentally similar to the IPF weightlifting bench standards. I used screws instead of glue, just in case the legs needed to be shortened later.

All edges were rounded over with a 1/2" bit, as the bench is expected to be picked up and moved frequently. And everything stained in cherry and clear-coated.

Some of the annoyances from using scrap included:

  • Stripping old paint off. Awful chemicals, awful scrubbing, awful disposal.
  • Sanding away twists along the 2x4 segments
  • Filling nail holes or arranging them so they don't draw attention
  • My lack of experience with clamping and gluing wood that's not dimensionally consistent

wood bench beside a leg press

If I were to do this again, I'd figure out a way to reduce the amount of routing needed for the inner edge, since I essentially removed 0.75 inch by 1.5 inch of material all around the edge. This took forever, and perhaps a CNC machine would have simplified things, in addition to squaring and planing the surfaces before mitering.


cross-posted from: https://sh.itjust.works/post/20965205

This is the story of how I turned a 15" Titan adjustable dumbbell to be 80 cm (31.5 inch) long. Why? Because I have a space-constrained home gym but still wanted a leg press, and so I had to remove its original barbell.

In its place, I built a pair of wood mounts for a normal barbell to rest upon, covered in that earlier post. However, since this machine is wall-adjacent, such a barbell would have to fit inside the width of the leg press, so about 80 cm. But must also be wider than the spacing from outside-edge to outside-edge of the wood mounts, which is 60 cm.

wooden mounts where a leg press barbell would be

Such a short barbell -- or long dumbbell -- does not readily exist commercially, with the narrowest one I've seen being 48 inch barbells, which are still too wide. So I decided to build my own, using my spare Titan dumbbell as the base.

To start, the Titan dumbbells are excellent in this capacity, as the shaft diameter is 28 mm -- not 32 mm as the website would indicate -- which is a common diameter, if I am to cut short a cheap barbell to replace this dumbbell's shaft.

In keeping with my preexisting frugality, I purchased a cheap 1-inch barbell, hoping that it adopts the Olympic 28 mm shaft diameter, and not the 29 mm deadlift bar shaft diameter, as the Titan collars have small clearances. Matching neither, I find that this bar is closer to 23 mm, which although will fit into the existing collars, poses its own issues.

Nevertheless, this 7 ft barbell can conveniently be cut in half to yield two 42 inch segments. And then the included bar stops can be loped off, and then the length further refined to 77 cm, thus hiding the marks from the bar stop within the Titan collars, and also centering the (meh) knurling from the cheap bar.

But perhaps a picture will be more explanatory. Here, the original collar is dismantled at the top, showing the original shaft with a groove cut into it, about 1/4-inch from the end. Into that groove would fit two half-rings with an inner diameter of 20.4 mm and an outer diameter of 40 mm. In fact, all the parts inside the collar use 40 mm outer diameter, except the spacer cylinder, which is smaller at 37 mm. All of these parts are held captive within the collar using the C-ring and the geometry of the collar itself.

To deal with the difference between the collar expecting 28 mm, and the cheap bar's 23 cm, I designed an ABS 3d printed part in FreeCAD to act as a bushing, upon which the original Titan brass bushing will ride upon. This ABS bushing is held captive by way of its center bulge, which fits within the dead space inside the collar.

As for how I cut the groove into the end of the new shaft, I still don't own a lathe. So the next best is to mount an angle grinder onto a "cross slide vise" taken from a drill press, with the shaft secured in a wooden jig to only allow axial rotation manually. The vise allows precision control for the cutting wheel's depth, with me pausing frequently to measure how close the groove is to the desired 20.4 mm inner diameter. This is.... not a quick nor precise process. But it definitely works.

After reassembling both collars onto the new shaft and lubricating with white lithium, the final result is a long dumbbell (or short barbell) with Titan's 3.5 inch collars on the end, with 63 cm of shaft exposed and 80 cm from end to end. The ABS bushing is remarkably smooth against the brass bushing, after some sanding with 180 grit. The whole dumbbell weights 5.48 kg empty.

Here is the comparison with the stock Titan dumbbell. It's pretty amazing how the knurling conveniently lined up. It fits well onto the wood mounts of the leg press.

Don't ever talk to me or my son ever again

But why would I do all this just to add a weirdly long 3.5-inch collar dumbbell to a leg press, when it already can accept weights underneath the carriage? I will answer that in a follow-up post.


As is their custom, FortNine delivers a two-wheeler review in the most cinematic way possible, along with a dose of British sitcom humor.

I'm not sure I'd ever buy one, but I'd definitely borrow it from a friend haha. I've said before that I like seeing what novel ideas people will build atop two wheels, and this certainly is very unique.

view more: next ›